
Are you confused about can lights vs recessed lights? You’re not alone—75% of homeowners struggle with this lighting choice!
While both provide sleek, modern lighting, their costs, installation, and long-term efficiency differ drastically.
By the end, you’ll know exactly which option saves money, fits low ceilings, and matches your decor style.
Table of Contents
What Are Can Lights and Recessed Lights?
Can lights typically consists of a metal can-shaped housing that is embedded in the ceiling and accommodates various types of light bulbs (such as halogen lamps, LED bulbs, Par30, Par38, MR16, GU10, etc.) to operate.
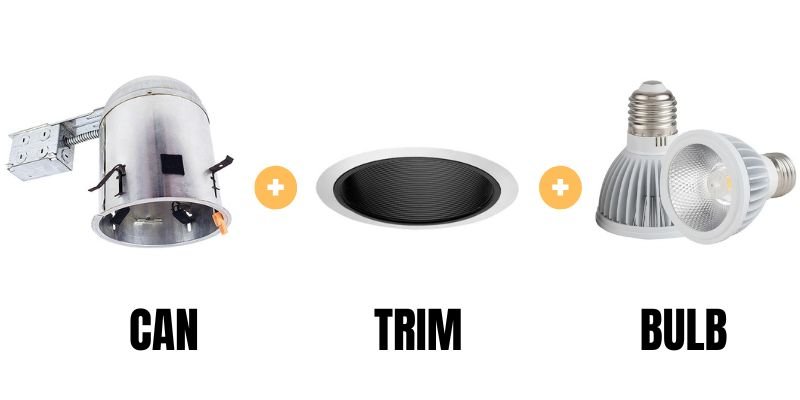
During operation, it dissipates heat via its metal housing. The bulb is also replaceable. It is typically available in sizes such as 4 inches and 6 inches.
Modern Recessed Lighting
Recessed lights, generally referring to recessed downlights and recessed ceiling spotlights, are modern lighting products that integrate the fixture housing and the LED light source into a single unit.


They are typically classified into fixed, adjustable, and ultra-thin LED types based on their function or form. These fixtures often feature a fully enclosed design, meaning the LED light source is usually not replaceable, and the entire fixture needs to be replaced upon failure.
Can Lights vs Recessed Lights: 5 Key Differences Compared
1. Design & Installation
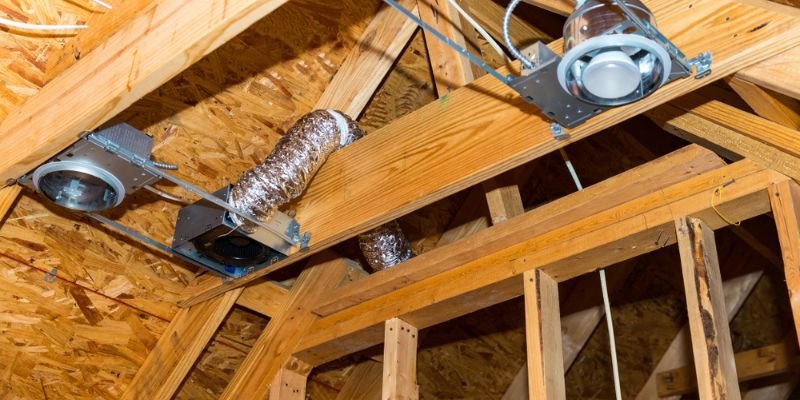
Can Lights: Require space for the housing/canister, installation is relatively complex, and they have certain requirements for ceiling height.
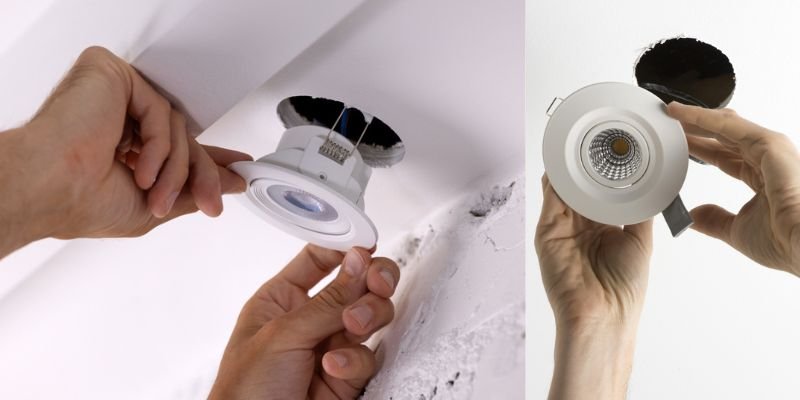
Recessed Lights: Ultra-thin design saves more installation space, making them especially suitable for lower ceilings.
2. Energy Efficiency and Lifespan
CAN Lights: Traditional recessed lights use incandescent or halogen bulbs, resulting in lower energy efficiency. Replacing the bulbs with LED equivalents can significantly improve their efficiency.
LED Recessed Lights (Downlights): LED recessed lights inherently use LED light sources, offering high energy efficiency and a lifespan exceeding 50,000 hours.
However, their design typically does not allow for individual replacement of the light source or other internal components.
3. Cost Over Time
Initial Cost: Can lights have a lower unit price but require the separate purchase of bulbs, increasing the total upfront cost. Recessed lights have a higher unit price because they usually include an integrated light source.
Long-Term Cost: In the long run, Recessed lights typically have lower maintenance costs.
4. Light Quality
Can lights: Limited adjustability, suitable for general lighting.
Recessed Lights: Optional adjustable angle models are available, making them ideal for accent lighting, such as wall washing or artwork lighting.
5. Smart Home Compatibility
Modern recessed lighting is now widely compatible with smart home systems. Options include Wi-Fi enabled recessed lights, voice-controlled recessed lighting, and smart dimmable downlights and spotlights, among others.
Which Is Better? Choosing Based on Your Needs
1. By Room
- Kitchen/Workspace: Prioritize Recessed Lights for high brightness and shadow-free illumination.
- Living Room/Bedroom: Recommend using Can Lights paired with dimmable bulbs to create a flexible atmosphere.
- Bathroom: Opt for Recessed Lights with an appropriate waterproof IP rating.
2. By Priority
- Budget Priority: Can lights (Cost-Effective Option)
- Long-term Energy Saving: Integrated LED Recessed Lights
- Design Flexibility: Adjustable Angle Recessed Lights
Installation Tips and Common Mistakes to Avoid
1. Installation Restrictions
Can Light Warnings: Check the ceiling’s load-bearing capacity and its compatibility with the insulation.
Recessed Light Hacks: Confirm IC (Insulation Contact) or Non-IC rating.
2. Retrofit Feasibility
Old house renovation: Slim profile recessed lights are better suited for narrow spaces.
Upgrading existing can lights: You can retain the original fixture housing and simply replace the LED module.
FAQs
Yes, you can install new LED recessed lights (often sold as retrofit kits) into traditional can lights (recessed housings). Key considerations include: ensuring you purchase the correct connector or adapter compatible with the existing wiring (such as an E26 screw-in base), and verifying that the size of the new fixture is compatible with the existing can's opening or cutout size.
If traditional downlights (or can lights) use traditional bulbs, they typically do not have smart home functionality. However, this issue can be resolved by using LED smart bulbs. Furthermore, some high-end models of LED downlights offer direct compatibility with smart home systems.
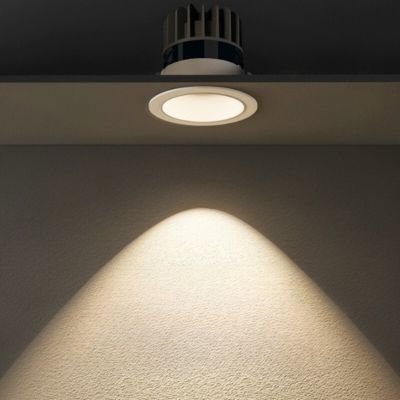
The "black hole" effect on ceilings after lamp installation, characterized by noticeable shadows or dark areas around the fixture, is typically caused by uneven light distribution, poor fixture design, or improper installation. Here are practical methods to avoid this issue:
I. Select Appropriate Lamp Types
- Prioritize Lamps with Wide Beam Angles: Spotlights with narrow beam angles (e.g., 15°~30°) concentrate light intensely in a small area, creating local highlights, while surrounding areas appear darker due to insufficient light. Switching to fixtures with wide beam angles (e.g., 45°~60°) spreads light more evenly, reducing sharp contrasts between bright and dark zones.
- Avoid "Deep-Recessed" Downlights: Deep-recessed fixtures have a large shielding angle, which tends to create distinct shadows on the ceiling edge around the fixture. Opt for shallow-recessed designs or fixtures with some edge light spill (like certain reflector-type spotlights) to minimize dark areas.
- Supplement with General Lighting: Combine main fixtures (like ceiling lamps or pendant lights) responsible for overall ambient lighting with spotlights/downlights used for accent or task lighting. This combination balances spatial brightness and prevents localized areas from being too dark.
II. Adjust Lamp Installation Positions
- Control the Distance Between the Lamp and Ceiling: If recessed lights are installed too deeply, the lamp body will obstruct the light output. Ensure the fixture's luminous surface is flush with the ceiling or consider using surface-mounted fixtures (like surface downlights).
- Avoid Concentrated Lamp Layouts: Arranging multiple spotlights too closely can create overlapping bright spots and alternating dark areas. Adopt a more dispersed layout or integrate linear light strips for uniform supplementary lighting.
- Consider the Ratio of Lamp Spacing to Ceiling Height: The recommended spacing for spotlights is typically 1.5 to 2 times the installation height (e.g., for a ceiling height of 2.8 meters, spacing of 1.2 to 1.5 meters). Excessive spacing will cause the areas between fixtures to appear dark.
III. Optimize Light Reflectance Conditions
- Utilize Ceiling Material to Enhance Diffuse Reflection: Matte white painted ceilings reflect light better than dark or glossy surfaces, helping to reduce dark zones. If the ceiling color is dark, you may need to increase the number of fixtures or use higher lumen output sources.
- Add Indirect Lighting as Support: Install light strips in ceiling coves, curtain boxes, or high on walls to illuminate the ceiling indirectly via reflection. This technique evenly lights the ceiling surface and helps eliminate shadows around main fixtures.
- Adjust Lamp Aiming Direction: For adjustable spotlights, avoid aiming them directly downwards. Instead, aim them towards walls or specific furniture to use reflected light to indirectly boost overall room brightness and reduce dark areas on the ceiling.
IV. Technical Detail Adjustments
- Select Light Sources with High Color Rendering Index (CRI > 90): Low CRI lighting can make dark areas appear "dirty." High CRI light renders colors more accurately, improves visual comfort, and subtly lessens the contrast of shadows.
- Ensure Consistent Color Temperature: Mixing fixtures with different color temperatures (e.g., cool white spotlights + warm white main light) can exacerbate the layered look of bright and dark areas. Using a consistent color temperature throughout the space (like 3000K or 4000K) creates a more harmonious lighting environment.
- Use Dimmers to Adjust Brightness: Adjust the brightness of spotlights based on scene requirements to avoid excessive contrast with ambient light, while also saving energy.
V. Solutions for Special Cases
- Low Ceiling Height (< 2.6 meters): Opt for ultra-thin ceiling lamps or surface-mounted fixtures to minimize the fixture's depth and reduce light blockage. Supplement with wall washer lights directed upwards to enhance the sense of space.
- Existing Pronounced Dark Areas: Install small supplementary recessed fixtures, surface spotlights, or use magnetic track lights in the vicinity of dark areas to provide additional light and localized correction.
- Shadows Caused by Decorative Pendant Lights: Choose pendant designs with upward-opening shades to direct some light onto the ceiling for reflection. Alternatively, add ceiling cove lighting around the pendant to balance the illumination.
These two types of lamps are designed to comply with various strict electrical safety standards. When properly installed, they ensure a high level of safety.
Conclusion
CAN lights and LED recessed fixtures present distinct characteristics and trade-offs concerning cost, flexibility, and energy efficiency. Your optimal choice should be based on your budget and space requirements. Looking ahead, ultra-thin LED recessed fixtures are expected to dominate the market in the next five years. However, utilizing existing CAN light structures for upgrades remains a common and effective solution in old house renovations.
Still unsure? Bookmark this guide or share it with your contractor.